|
|
|
|
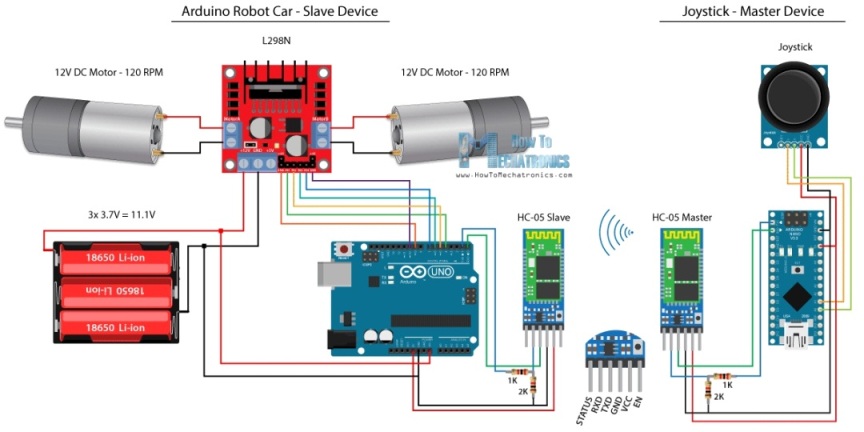
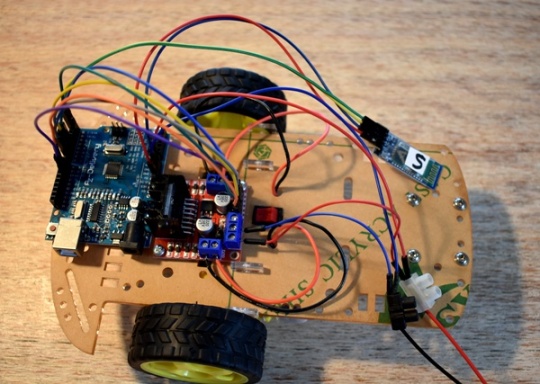
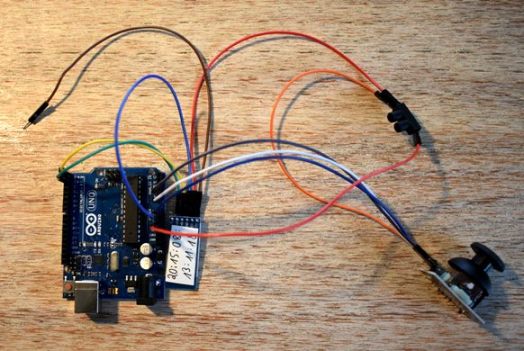
Nachdem im Tutorial HC-05 je ein Modul als Master und Slave eingerichtet wurde,
kann man diese beiden Module benutzen, um ein Arduino Car drahtlos zu steuern.
Dieses Beispiel findet man auch auf folgender Seite im Internet. Arduino Car - Howtomechatronics Anmerkung: Auf den Seiten von Howtomechatronics gibt es viele tolle Beispiele für den Arduino. Bei den behandelten Theman liegt der Schwerpunkt auf der Funkverbindung. Was weiter noch besonders zu erwähnen wäre, ist die Tatsache, dass die von mir bisher ausprobierten Projekte ohne Probleme laufen. |
|
 |
|
|
Die in den Schaltungen eingebauten Widerstände (1 kOhm und 2 KOhm) wurden
weggelassen. In vielen Schaltungsbeispielen wird dagegen auf die
Notwendigkeit hingewiesen. Ich habe aber bisher keine Beschädigungen des HC-05 Moduls
feststellen können. In Ermangelung eines Arduino Nanos für den Master wurde ein Arduino Uno genommen. |
|
|
int xAxis, yAxis; void setup() { Serial.begin(38400); // Default communication rate of the Bluetooth module } void loop() { xAxis = analogRead(A0); // Read Joysticks X-axis yAxis = analogRead(A1); // Read Joysticks Y-axis // Send the values via the serial port to the slave HC-05 Bluetooth device Serial.write(xAxis/4); // Dividing by 4 for converting from 0 - 1023 to 0 - 256, (1 byte) range Serial.write(yAxis/4); delay(20); } |
#define in1 4 #define in2 5 #define enB 10 #define in3 6 #define in4 7 int xAxis, yAxis; unsigned int x = 0; unsigned int y = 0; int motorSpeedA = 0; int motorSpeedB = 0; void setup() { pinMode(enA, OUTPUT); pinMode(enB, OUTPUT); pinMode(in1, OUTPUT); pinMode(in2, OUTPUT); pinMode(in3, OUTPUT); pinMode(in4, OUTPUT); Serial.begin(38400); // Default communication rate of the Bluetooth module } |
|
void loop() { // Default value - no movement when the Joystick stays in the center x = 510 / 4; y = 510 / 4; // Read the incoming data from the Joystick, or the master Bluetooth device while (Serial.available() >= 2) { x = Serial.read(); delay(10); y = Serial.read(); } delay(10); // Convert back the 0 - 255 range to 0 - 1023, suitable for motor control code below xAxis = x*4; yAxis = y*4; // Y-axis used for forward and backward control if (yAxis < 470) { // Set Motor A backward digitalWrite(in1, HIGH); digitalWrite(in2, LOW); // Set Motor B backward digitalWrite(in3, HIGH); digitalWrite(in4, LOW); // Convert the declining Y-axis readings for going backward from 470 to 0 into 0 to //255 value for the PWM signal for increasing the motor speed motorSpeedA = map(yAxis, 470, 0, 0, 255); motorSpeedB = map(yAxis, 470, 0, 0, 255); } else if (yAxis > 550) { // Set Motor A forward digitalWrite(in1, LOW); digitalWrite(in2, HIGH); // Set Motor B forward digitalWrite(in3, LOW); digitalWrite(in4, HIGH); // Convert the increasing Y-axis readings for going forward from 550 to 1023 into 0 to //255 value for the PWM signal for increasing the motor speed motorSpeedA = map(yAxis, 550, 1023, 0, 255); motorSpeedB = map(yAxis, 550, 1023, 0, 255); } // If joystick stays in middle the motors are not moving else { motorSpeedA = 0; motorSpeedB = 0; } |
// X-axis used for left and right control if (xAxis < 470) { // Convert the declining X-axis readings from 470 to 0 into increasing 0 to 255 value int xMapped = map(xAxis, 470, 0, 0, 255); // Move to left - decrease left motor speed, increase right motor speed motorSpeedA = motorSpeedA - xMapped; motorSpeedB = motorSpeedB + xMapped; // Confine the range from 0 to 255 if (motorSpeedA < 0) { motorSpeedA = 0; } if (motorSpeedB > 255) { motorSpeedB = 255; } } if (xAxis > 550) { // Convert the increasing X-axis readings from 550 to 1023 into 0 to 255 value int xMapped = map(xAxis, 550, 1023, 0, 255); // Move right - decrease right motor speed, increase left motor speed motorSpeedA = motorSpeedA + xMapped; motorSpeedB = motorSpeedB - xMapped; // Confine the range from 0 to 255 if (motorSpeedA > 255) { } if (motorSpeedB < 0) { motorSpeedB = 0; } } // Prevent buzzing at low speeds (Adjust according to your motors. //My motors couldn't start moving if PWM value was below value of 70) if (motorSpeedA < 70) { motorSpeedA = 0; } if (motorSpeedB < 70) { motorSpeedB = 0; } analogWrite(enA, motorSpeedA); // Send PWM signal to motor A analogWrite(enB, motorSpeedB); // Send PWM signal to motor B } |
 |
 |